Got a Question?
Tips and tricks
Since version 7.0 released in February 2023, the application files are no longer stored in the sailgrib directory of the main memory of the device.
Google forces us to put them in a hidden directory ( /storage/emulated/0/Android/data/com.sailgrib_wr.paid/files/sailgrib/) .
The most visible consequence for users is that if you save a grib file from an email for example, it is no longer directly visible by SailGrib WR.
You have to import it.
To do this, we have created a new Menu “Import a file”.

The application will search for files by default in the Download directory.
You can sort them by date to have the most recent files at the top of the list


Choose the file to import, it will be copied and available in the application.
PermalinkSince version 7.0 released in February 2023, the application files are no longer stored in the sailgrib directory of the device’s main memory.
Google forces us to put them in a hidden directory (/storage/emulated/0/Android/data/com.sailgrib_wr.paid/files/sailgrib/).
The most visible consequence for the users is that if you want to share for example a route, you can’t do it with a file manager anymore.
For this we have created a new Menu “Share, save or delete a file”.


If you decide to save a file, it will be saved in a subdirectory of download/sailgrib
PermalinkSailGrib WR’s polar library includes more than 400 boats. Most of these polar are theoretical and come from software called VPP (Velocity Prediction Program).
They are often optimistic and must be adjusted according to the way you sail.
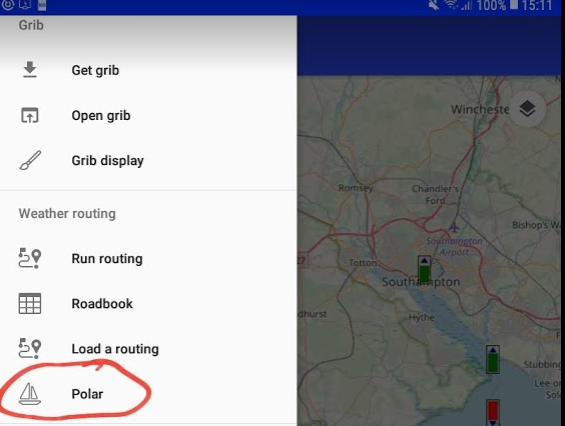
To display a polar, go to the left menu and choose “polar”.
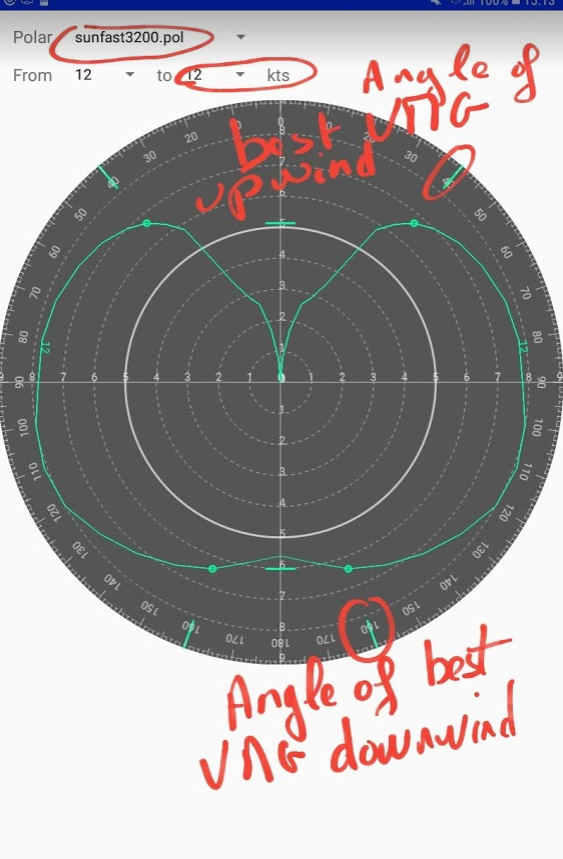
Take a good look at the speeds indicated by these polar diagrams at different true wind angles and ask yourself the question: is this reasonable for a routing?
Here, for example, for a Sun Fast 3200 in 12 knots of wind.
- upwind, a boat surface speed or speed through water (STW) of 6.8 knots with a true wind angle (TWA) of 40°, is this reasonable for a routing? My answer is No, most likely I will sail around 6.2 knots with a TWA of 45°. The polar speed for a TWA of 45° is 7.1 knots. I will therefore sail at 87% of the polar with a 45° limit.
- crosswind, a STW of 7.8 knots for a 90° TWA, is this reasonable for a routing? My answer is No, I will sail at around 7.2 knots or 92% of the polar.
- downwind, a STW of 6.2 knots for a 160° TWA, is this reasonable for a routing? My answer is No, I will sail at around 5.8 knots or 93% of the polar.
With this quick approach, I believe I should sail at around 90% of the boat polar at 12 knots with a 45° upwind limit.
In the app, you can easily modify a polar in the routing menu using the following settings:
a minimum upwind angle: if, as in the example above, the theoretical polar indicates an upwind angle of 40° in 12 knots of true wind, this is probably impracticable when sailing. Enter 45° for this parameter.
a maximum downwind angle: this is more for safety reasons. If the theoretical polar indicates a downwind angle of 175° for 12 knots, it is probably not a good idea when sailing and you don’t want the routing to propose that. For example, enter 165° for this parameter. An autopilot will probably be able to steer in true wind mode at 165° without risking gybing. In the above case, the best downwind angle at 12 knots is 160°, the polar at 12 knots will not be affected by this parameter.
2 polar efficiency coefficients. One below 10 knots of true wind, the other above 20 knots. To ensure continuity, the app will linearly interpolate the coefficient between 10 and 20 nodes. If cruising, you should notice that you sail between 70% and 75% of the theoretical polar in light winds and between 75% and 80% above 20 knots. For racing yachts we can see that we are generally around 90% of the theoretical polar and sometimes around 85% in light airs.
If you have connected the app to the boat’s NMEA data, this output can be displayed permanently. Even better, you can display the graph of this performance with the Histograms module. Use these indications to adjust the coefficients in the routing menu.
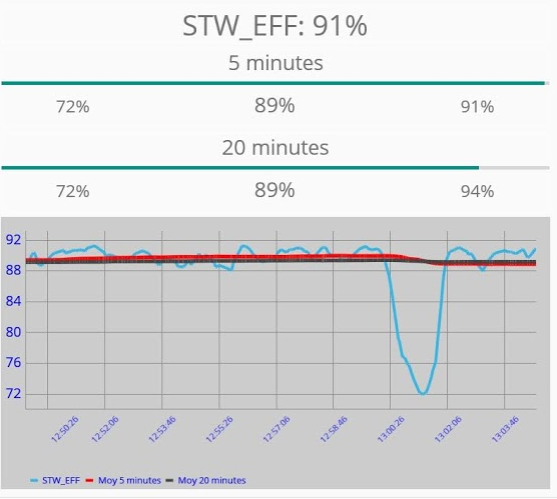
Here, we sail at 91% of the Sun Fast 3200 polar by 16 knots across, the sea is flat.
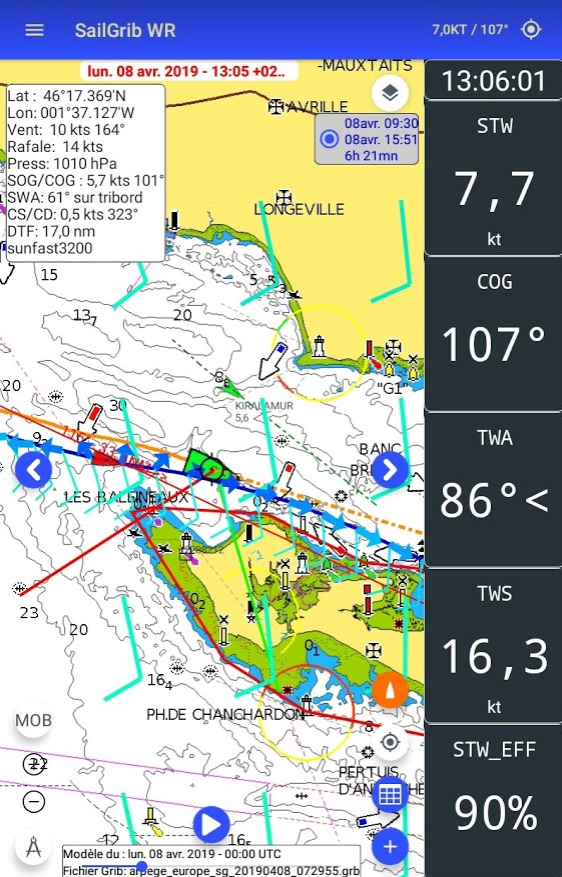
The efficiency percentage is very stable around 90%. We take a reef to see how the boat behaves. No significant change in performance. The reefing lasted 2 minutes and the efficiency percentage fell to 72% during this time. In a race, at 7.7 knots, we would have lost around 85 meters or 8 boat lengths…
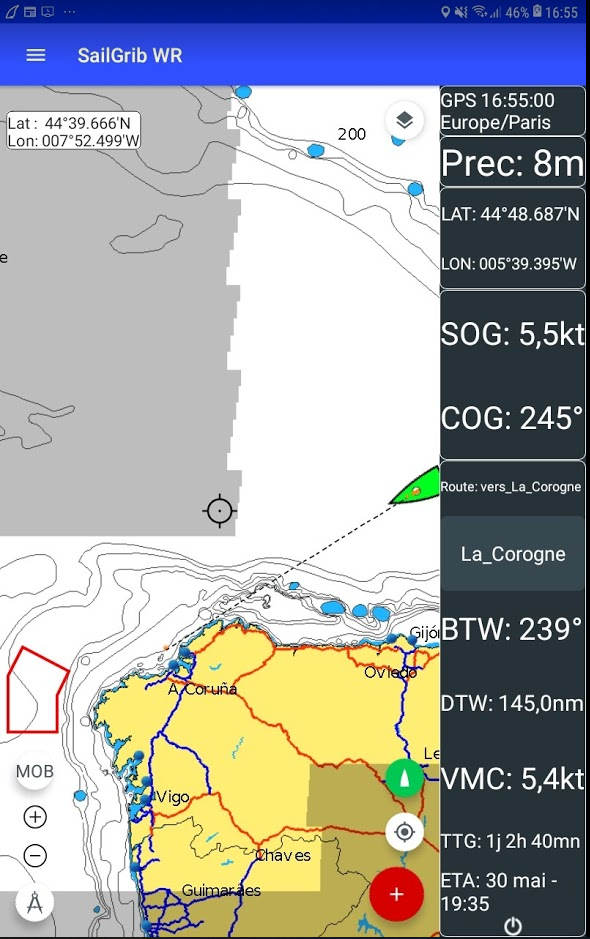
When navigating to a given waypoint, create a mark at that waypoint location and activate it.
The app will give you the basic navigation data:
BTW : Bearing to waypoint
DTW: Distance to waypoint
VMC: Velocity Made on Course, this is the speed of approach to the waypoint
TTG: Estimated sailing time to this waypoint at the VMC
ETA: Estimated time of arrival at the waypoint
1/ Create a Mark:
- if you have checked the option “Waypoint at screen center”:
* center the map on the desired location
* make a long press anywhere on the map
if you have not checked the option “Waypoint at screen center”:
* make a long press at the location where you want to create a waypoint - choose the Manage Marksmenu
- choose the Create a mark option
- enter a name and choose an icon for this mark
- press the Save button
2/ Activate a mark:
- if you have checked the option “Waypoint at screen center”:
* center the map on the desired mark
* make a long press anywhere on the map
if you have not checked the option “Waypoint at screen center”:
* make a long press on the mark you want to activate - choose the Manage Marks menu
- choose the Activate mark option
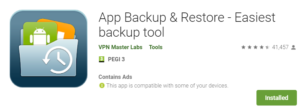
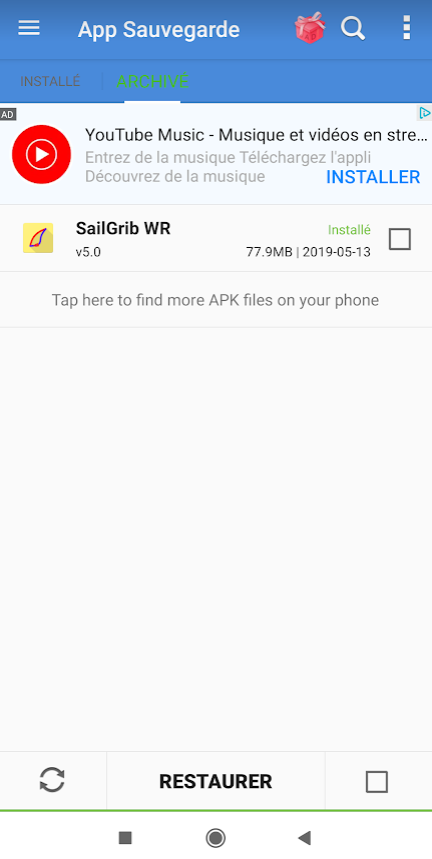
If you go offshore, remember to save the app on your device, this will allow you to reinstall it without an Internet connection.
The easiest way to do this is to install the App Backup & Restore app and make a local backup of the SailGrib WR apk installation file.
Make a backup
- Click on the “Installed” tab
- Select the app to be backed up
- Click on the Save selected apps button
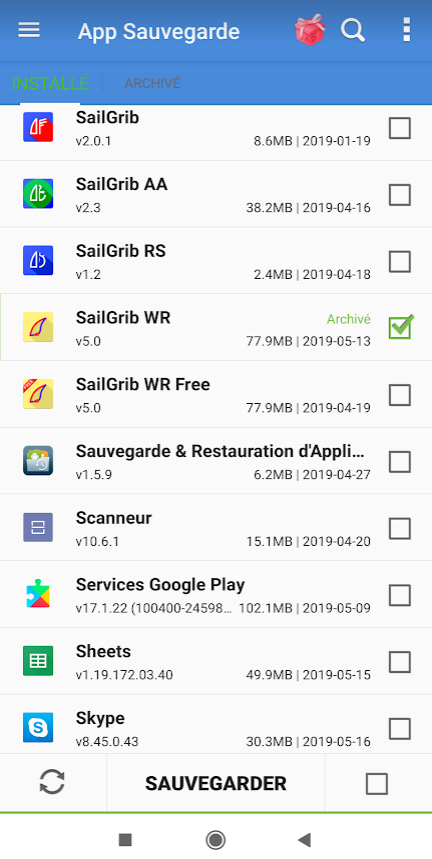
Restore an archived app
- Click on the “Archived” tab
- Select the app to restore
- Click on the Restore selected apps button
If you go offshore, remember to save your Navionics charts on your device, this will allow you to reinstall them without an Internet connection.
Here is the procedure:
In SailGrib WR, go to the Settingsmenu > Charts
Press the Backup your Navionics charts button
Confirm backup
If you “lose” your Navionics charts offshore or need to reinstall the app, you can then recover them with the following procedure:
Go to the Settings menu > Charts
Press the Restore your Navionics charts button
Confirm restoration
Note that you can do the backup procedure manually using a file manager.
Copy the entire
Android/Data/com.sailgrib_wr.paid/files/com.sailgrib_wr.paid/Navionics
directory to the
sailgrib/navionics_backup
directory on the main memory of your device (eventually create it).
Once you have erased the SailGrib app data, restore your Navionics charts: Settings>charts > Restore Navionics charts.
We do our best not to let this happen, but if for some reason the app crashes systematically at startup, you can recover it by resetting all the apps settings to their default values. To do this, you will need to delete all the data in the app.
WARNING: this will erase your Navionics charts used in the app. Make a backup of these files first.
- either in the app if you can still access it. Settings > Charts > Backup Navionics charts
- using a file manager copy the entire
Android/Data/com.sailgrib_wr.paid/files/com.sailgrib_wr.paid/Navionics
directory to the
sailgrib/navionics_backup
directory on the main memory of your device (eventually create it).
Once you have erased the SailGrib app data, restore your Navionics charts: Settings>charts > Restore Navionics charts.
Here is the procedure to follow:
- Open the Android Settings app
on your device.
- Tap apps and notifications.
- Tap Show apps
- Choose the SailGrib WR app
- Press Storage
- Tap Clear data. If the “Clear data” option is not displayed, press Manage space and delete the data
SailGrib WR displays AIS targets received over the Internet through the AISHub service.
We encourage you to contribute by sharing data from your AIS receiver while sailing. This will turn your boat into a mobile station. Targets received by your boat’s AIS receiver will be displayed in green, those received by the Internet in blue.

Here is the procedure to follow:
- Go to the GPS NMEA AIS menu > AIS settings
- Check Share AIS data. These data will be disseminated on AISHub. They will be accessible on SailGrib WR, Weather4D and all sites like MarineTraffic, VesselFinder…
- Check Share own ship data. Meteorological or hydrological data from the boat such as average wind speed and direction, gusts, atmospheric pressure will be shared with all SailGrib WR and Weather4D users. The targets will appear in light blue on the screen.


If you have difficulties connecting to the NMEA + AIS feed via WiFi and at the same time remain connected to the Internet via 4G, you must delete the “default gateway” of your NMEA + AIS multiplexer
- Open the Android Settings app
- Go to the WiFi settings
- Select the WiFi network of the multiplexer to which you are connected and display its settings.
- In the IP settings, change DHCP Protocol to Static (or Manual)
- Delete the default route or gateway (often of the type 192.168.86.1)
- Press the Edit Network button
You should now be able to receive your NMEA and AIS data while remaining connected to 4G.
Be careful, this procedure does not work with all multiplexers. Some, like the vYacht, refuse to delete the “default route”.
PermalinkAISHub is a real-time AIS data sharing network to which SailGrib contributes and subscribes.
This allows you to view the AIS data of the AISHub network in SailGrib WR.
Unfortunately, not all areas are covered by AISHub. We encourage you to contribute by setting up an AIS station in your home. You can find the AISHub real-time coverage map here.
Here is the AISHub coverage of the England south coast on May 22, 2019

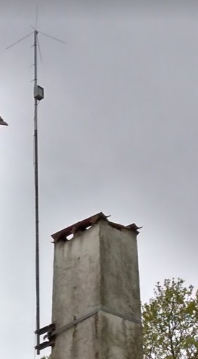
How to install a fixed AIS station and share data?
- live by the sea and have a relatively clear view.
- build an AIS station for about 250€
- Place the receiver in a waterproof electrical box, and install it on a mast with the AIS antenna. Install and configure rPiAIS (it’s very simple).
- Connect the Raspberry to the Internet and to the AIS receiver with the USB cable.
- Plug it in